Thursday, April 12, 2012

Not Just Baked Goods!

So far, we've shared a few of our favorite festive recipes to cook up. But the fun doesn't stop there! We like to make other confectionary treats, like chocolates! Each Easter, we put together personalized baskets for our family and friends, but we think baskets make for great gifts anytime of the year! We've also done Mother's Day baskets and Birthday baskets! Each one is tailored to the giftee and whatever holiday/occasion the basket is being given for!

Check out some of our Easter baskets below and drop us a line at howsweetitisny@gmail.com to order a basket for your next upcoming occasion!


And here we have *some* of the specialty treats found in our baskets:


Chocolate Dipped Peep S'mores


Chocolate Dipped Rice Krispies Treat Egg

Assorted Sugar Cookies with Royal Icing


Giant Crisp Chocolate Egg

Assorted Mini Chocolates in Milk, Dark, White, and Crisp

Chocolate Covered Oreos

"Bunny Trail Mix"- Popcorn, pretzels, and M&Ms drizzled in colored chocolate

Chocolate Covered Pretzel Twists

Chocolate Covered Pretzel Rods (In Bunny, Basket, and Carrot designs).

In addition to the treats pictured, baskets included the following:
-Homemade Candy Buttons
-Peanut Butter Eggs
-Ritz crackers with Peanut Butter dipped in Chocolate
-Chocolate Dipped Peeps
-Chocolate Dipped Bunny Marshmallows
-Assorted Chocolate Lollipops
-Small Hollow Chocolate Bunny
-Chocolate Easter Egg Cake Pops
-Goldfish "Carrots"
-Jelly Beans, M&Ms, and Skittles

In addition to the sugar rush in a basket, we added little gifts for each giftee depending on their age and what they enjoyed. The gifts ranged from Easter themed stickers to nail polish and even to mini bottles of Godiva Chocolate Liquer in the adult Easter basket!

We hope you enjoyed checking out our Easter baskets and hope to hear from you for your own occasion basket soon! Til next time!

Friday, March 16, 2012

Shamrock Whoopie Pies

This weekend is my favorite holiday!!!

St. Patrick's Day, of course!! With names like Sullivan and O'Connor, I'm sure that's not much of a surprise though! So in celebration (and in preparation of the drunken munchies later) I've prepared Green Velvet Whoopie Pies!! These are one of my favorite desserts- is it a cookie? Is it a cake? C'mon, even the name is fun! And it's so hard to find a good one! You know the saying- if you want something done right, you've got to do it yourself. So I grabbed my green food coloring and this recipe from Annie's Eats and I was on my way!


If you notice, I tripled Annie's recipe! My reasoning was that the shamrocks would need to be larger than the hearts to get the effect and also I just wanted more to go around. I ended up with 20 shamrock sandwiches in total (and one little half circle that I just piped some icing on so I could have a taste! It was goooooood.)

Green Velvet Whoopie Pies


- 6 Cups All Purpose Flour

- 6 Tablespoons Cocoa Powder

- 1 1/2 Teaspoons Baking Powder

- 3/4 Teaspoon Salt

- 1 1/2 Cups Unsalted Butter, Room Temperature (3 Sticks)

- 3 Cups Light Brown Sugar, Packed

- 3 Large Eggs at Room Temperature

- 3 Teaspoons Vanilla Extract

- 1 1/2 Cups Buttermilk at Room Temperature

- 1/2- 1 Oz. of Green Food Coloring (McCormick)

1. Using a pencil, lightly trace your design onto parchment paper and line cookie sheets. Make sure the traced side is face down, nobody wants any lead in their whoopie pies! Also, when choosing a design to trace, make sure the design is smaller than you want the actually whoopie pie to be as the batter spreads when baked.


2. In a large mixing bowl, whisk together flour, cocoa powder, baking powder, and salt. In the bowl of your stand mixer, cream together butter and brown sugar on medium speed for about 3 minutes or until light and fluffy.


3. Switch mixer to lower speed and beat in eggs one at a time until incorporated. Beat in vanilla extract. Keeping mixer on low speed, beat in 1/3 of the flour mixture. Add in half the buttermilk and another 1/3 of the dry ingredients. Add in the rest of the buttermilk followed by the remainder of the dry ingredients.*

*For this step, it's important to do it kind of quickly. You don't want to overmix your batter so once each part is incorporated (but not before!), immediately add the next. You can stop the mixer to scrape the sides, though.*


Blend in food coloring- I used a little more than 1/2 oz. of green to achieve the color I wanted.

4. Fill a pastry bag with batter. You can either use a round tip or simply snip the end of the decorating bag. I just snipped the tip because I'm laaaaaaazy. Pipe batter along design outline and fill in the middle. It doesn't have to be perfect, it settles nicely. And besides, whoopie pies aren't really supposed to look perfect!


5. Bake on center rack about 7-9 minutes, rotating if necessary. 8 minutes was the magic number for my oven! Let cool on cookie sheet about 10 minutes before transferring to cooling rack. Use a cookie spatula to remove cookies from parchment paper. Repeat with any remaining batter.


Now since these are technically red velvet, Annie paired her cookies with a cream cheese filling, but I say nay. I loooooooove the classic whoopie pie filling so I opted to use my own recipe for the filling.

Vanilla Cream Filling


- 1/2 Cup Vegetable Shortening

- 1/2 Cup Unsalted Butter at Room Temperature (1 Stick)

- 2 Cups Powdered Sugar, sifted

- 3 Teaspoons Pure Vanilla Extract

- 3/4 Cup Light Corn Syrup

1. Cream shortening and butter together at medium speed. With mixer at lowest speed, gradually add powdered sugar until incorporated, scraping down sides when necessary. Increase speed to high and beat for about 4 minutes or until light and fluffy.

2. Decrease speed and beat in vanilla extract. Keeping mixer on low, slowly drizzle in corny syrup. Continue to beat for about 1- 2 minutes until filling has reached desired consistency.

From here you can either prepare a piping with a round tip and pipe the filling onto the cookies or you can spoon a tablespoon of filling onto each cookie. I started out by piping, but quickly switched to using a tablespoon. It really makes no difference since you're going to be squishing the filling between two cookies anyway.

Oh hello there, lover!


I can't even tell you how good that cream is!


Thanks everyone for checking out the blog! Have a happy and safe St. Patrick's Day! Don't do anything I wouldn't do! ;o)

Wednesday, March 7, 2012

Happy Birthday, Sister!!!

On March 4th, my favorite sister turned 19.
::Faint::
Way to make me feel old, Kelly!

Here's Kelly with her "World's Best Boss" mug from her Office Kit.

My mom and I wanted to make her a really special cake for her last year as a teenager. We already knew it had to be something pink as that is Kelly's favorite color. We asked Kelly what flavor cake she wanted and she requested Cookies 'n' Cream. No problem!! But she requested Cookies 'n' Cream cake like they do on Ace of Cakes. Now even though I love to bake, I don't really watch any baking shows (Aside from Top Chef: Just Desserts, of course!) so I had no idea what she meant. Apparently, Chef Duff makes a white cake with a marble ribbon of Oreo cookie crumbs. Sounds delicious right? I searched high and low and couldn't find a "Marble Cookies and Cream" recipe, so we decided to wing it. It didn't come out exactly as I had hoped, but it was still really delicious and now I know exactly what I need to do for next time. That's what I'm here for right? Your personal guinea pig! ;o)

White Cake

This recipe was adapted from Joy of Baking. I pretty much followed the recipe exactly as it appers on the site, but I doubled it to make for a taller cake. You'll see why! I also want to mention, don't be intimidated by this recipe! It is a lot of steps and might seem a little complicated, but it's not difficult and it makes a really delicious cake. I chose this recipe specifically because I find that this cake isn't too sweet which is perfect since we're putting Oreo Cream icing on top of it and that is very sweet! In a good way, of course!

- 4 Large eggs separated

- 2 1/2 Cups cake flour, sifted

- 4 Teaspoons baking powder

- 1/2 Teaspoon salt

- 1 Cup unsalted butter (2 Sticks), at room temperature

- 2 Cups granulated sugar, divided

- 2 Teaspoons pur vanilla extract

- 1 Cup milk

- 1/4 Teaspoon cream of tartar

1. Pre-heat oven to 350 degrees. Grease 2- 9" round cake pans with butter or Pam. Cut out rounds of parchment paper to place in bottom of pan. Grease parchment paper and flour. Lightly flour sides of pan as well.


2. While eggs are cold, separate 4 eggs into two bowls: whites in one bowl and yolks in the other. Cover and set aside, allowing eggs to come to room temperature.


3. In a mixing bowl, sift together cake flour, baking powder, and salt. Whisk to combine.

4. In the bowl of your electric mixer, beat butter on medium speed until soft (about 1-2 minutes). Add 1 1/2 cups granulated sugar and beat on medium speed until light and fluffy (about 2-3 minutes). While beating on medium speed, add egg yolks one at a time until incorporated. Scrape down sides of bowl when necessary. Add vanilla extract and beat until combined.

5. With mixer on low speed, alternately add flour mixture and milk, beginning and ending with flour. I used 5 incorporations to add everything in the pattern of: flour, milk, flour, milk, flour.

6. Attach whisk attachment to stand mixer or hand mixer.* In a clean bowl, beat eggs whites until foamy (about 4-5 minutes). Start out at a low speed and increase speed gradually. Add cream of tartar and continue beating at medium/high speed until soft peaks form.

It's kind of hard to see, but you can see the soft peaks here.

Gradually add remaining 1/2 cup of granulated sugar until stiff peaks form.

Stiff peaks!

With a rubber spatula, gently fold egg white mixture into batter. This will inflate and lighten your batter. Overmixing will cause batter to deflate and your cake to come out flat.

*The recipe specifically says to use your stand mixer, but most people I know (myself included!) only have one stand mixer bowl! You can switch your batter to another bowl and use your stand mixer or you can just use a hand mixer, like I did. Boy, did it suck having to stand there holding that mixer for 5 minutes straight though! It made me appreciate Betty (my nickname for my Kitchenaid) all the more!*

Now, in an attempt to make the marble swirl, I added a few extra steps. Unfortunately, it wound up not being very cookie-y, but I'll explain what happened and how to correct it here. If you don't want the cookie crumbs in your cake, feel free to skip on down to step 4 below.

Cookies 'n' Cream Marble Swirl

1. Place sleeve (about 15 cookies) of Oreos, unwrapped, in a Ziploc bag. Do *not* zip the bag the entire way, leave a little opening for air to escape. Place Ziploc bag with cookies into another Ziploc bag with the zips facing away from each other. Again, do *not* zip bag entirely. Leave a small opening for air to escape. Repeat with second sleeve of cookies.

2. Using a mallet (or rolling pin, or hammer, or book, or anything heavy and handheld that you have lying around), crumble cookies into small pieces and crumbs.

3. Pour 1/4 of batter into each prepared 9" pan. Set aside additional batter. Sprinkle cookies crumbs in a ring in each pan. Divide batter and pour left over batter over cookies crumbs.*

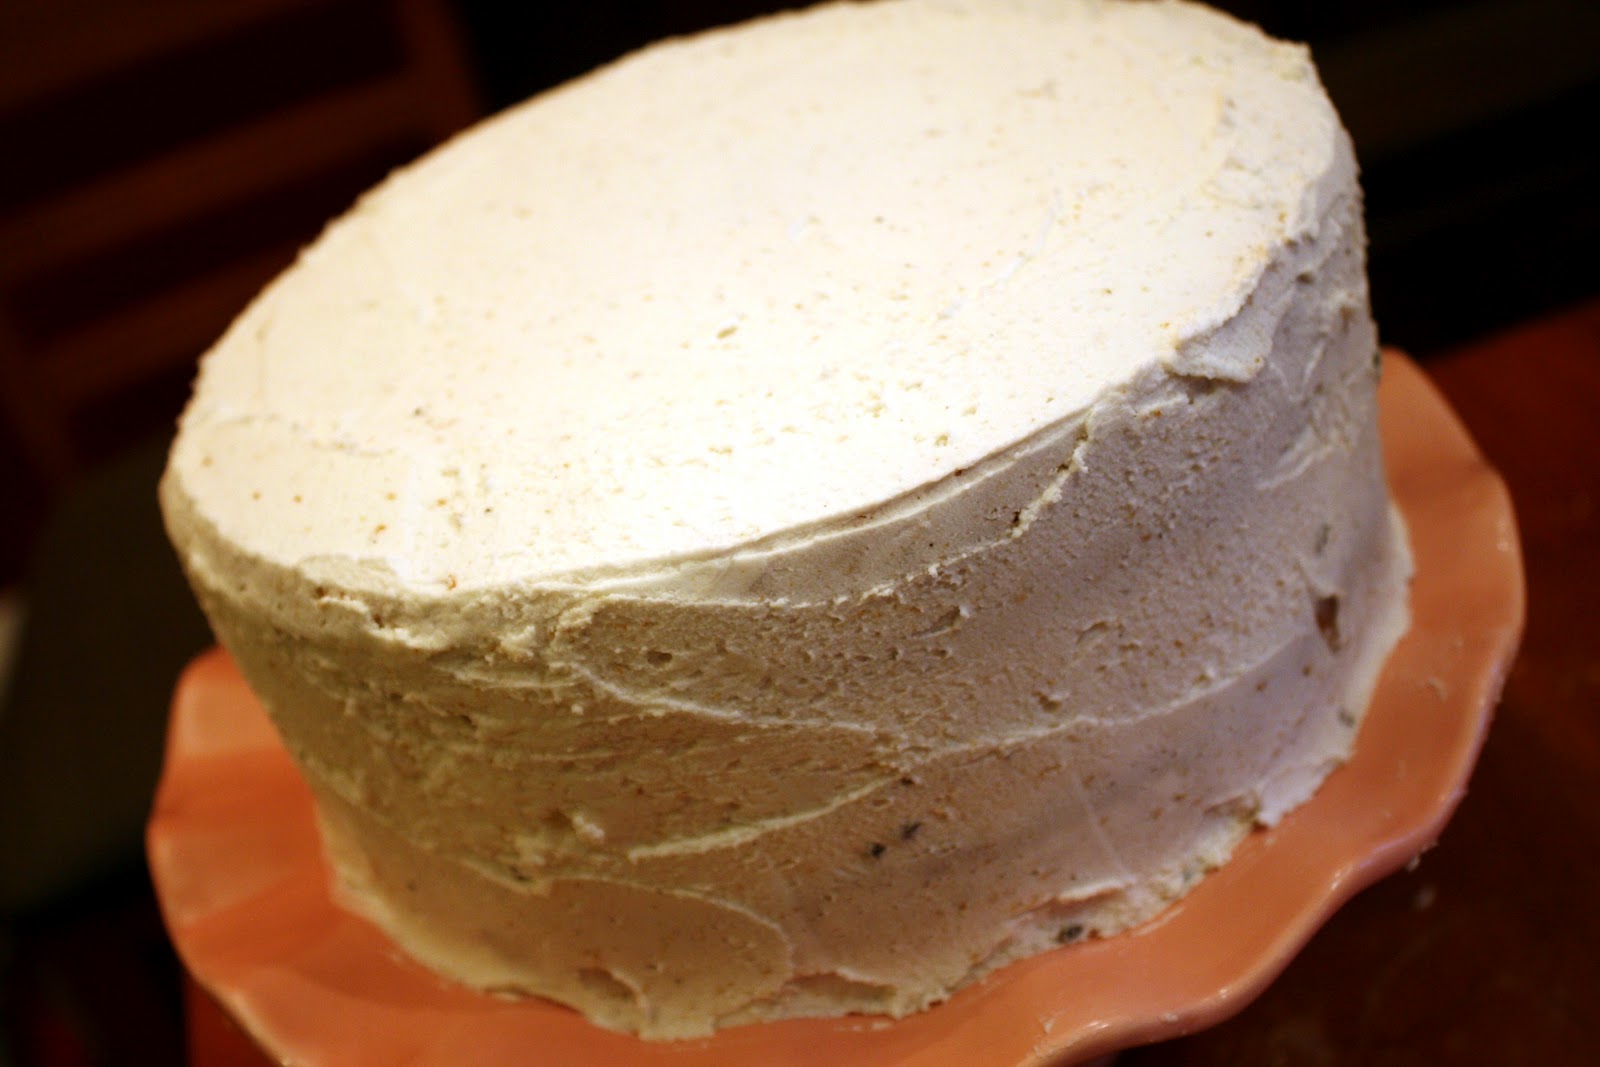
*Here's where I made my mistake. I *assumed* (and we all know what they say about people who assume, don't we?!) that the cookie crumbs would sink and settle into my batter while baking. I didn't want to end up with the crumbs at the bottom, so I sprinkled them on top and put them in the oven to bake. If I had a less dense cake batter, it might've worked. Unfortunately for me, they didn't sink. The cookie crumbs just baked right into the top of the cake. When I leveled the cakes to stack them, I pretty much removed all the cookie crumbs from the cake itself. Whoops! But, I tried those cake scraps and OH MAN was it good! Yum!*

My oreo crumbs on top of the cake batter. Womp womp.

4. Bake at 350 degrees for about 22- 28 minutes (25 was the magic number for my oven.) or until toothpick inserted in center comes out clean. Cool cakes completely on wire racks before leveling/frosting.

Oreo Cream Icing

This recipe was adapted from Better Homes & Garden. We chose this recipe because we wanted a recipe that tastes like the cream you find inside an Oreo (and this one tastes exactly like that!) and because we needed a smooth icing recipe (one with no cookie pieces in the icing). Again, you'll see why! I don't make this up for no reason! Hehe! This recipe was tripled from the recipe that you will find on BHG's site. And I still needed extra after all was said and done. Bananas, I know.


- 1 1/2 Cups vegetable shortening

- 3 Teaspoons vanilla

- 6 3/4 cups powdered sugar, sifted, divided

- 4- 6 Tablespoons milk

1. In a large mixing bowl, beat vanilla and shortening at medium speed for about 30 seconds. Sift 3 3/4 cups powdered sugar into a separate bowl.

2. With mixer at low/medium speed, gradually add powdered sugar until mixed well. Add 3 tablespoons milk and beat until incorporated. Scrape down sides of bowl when necessary.

3. Sift 3 cups powdered sugar into a separate bowl. With mixer at low/medium speed, gradually add powdered sugar, beating until incorporated.

4. Add milk 1 tablespoon at a time until icing has reached desired consistency.

*Since I had a little fail as far as the cookies 'n' cream cake went, I added some cookies crumbs to part of the icing. I used this icing to fill and crumb coat the cake. I left the rest of the icing smooth for piping.*

Cookies and Cream crumb coat!

And here is the reason I needed so much icing! We wanted to do a pink "ombre swirl" cake. If you have no idea what "ombre" is, it is the French word for "shade" or "shading". As far as hair and clothes, ombre refers to the gradual deepening or lightening of a color. Here is how I got the ombre effect.

Pink Swirl Ombre

1. Prepare your favorite icing recipe (doubling or tripling if necessary, this design takes quite a bit of icing!). Using a toothpick, add a very small amount food coloring gel (not liquid food coloring drops!) to entire batch of icing. Once you've reached the desired color, set aside about 1 1/2 cups of icing in a separate bowl. This will be your top most design layer so it will cover the top as well as the sides.

2. Using a toothpick, add a little more food coloring gel to remaining icing. This should be one shade darker than the icing you have set aside. Set aside 1/2 cup of icing in a separate bowl. Repeat twice more until you have 4 shades of color.

The darkest pink isn't shown since it was transferred from my mixing bowl directly to a piping bag.

3. Prepare an icing bag with your chosen star tip (open or closed, doesn't matter, but each will give your design a different effect). I used Wilton's #21. It's mid-sized and worked out perfectly for this cake. Originally I had planned to use Wilton's 1M, but that was a little large for this cake. Fill bag with darkest color icing.

4. Beginning at the bottom of the cake, pipe icing onto cake in a circular motion. I started from the outside and swirled the icing into the center of the circles I made, but either way really works. Continue around the entire cake. Repeat with other icing colors.

5. For the top, I started piping my swirls along the outer perimeter of the top of the cake and gradually worked my way to the middle. You might notice some "bald" spots on the sides or the top. You can fill these in by squeezing leftover icing (in the corresponding color) into the space. If it's a bigger bald spot, use a curved or swirling motion so the additional icing goes along with the original design.


Now doesn't that look sweet?


And oh boy, it was.

Friday, March 2, 2012

Peanut Butter Eggs

Psssst. Want to know the way to this girl's heart? It's really simple....

Chocolate & Peanut Butter.

I'm not exaggerating when I say I could live on these two things alone. My favorite candy of all time is a Reese's, for obvious reasons, but I like them even better around the holidays when you get the double dose of peanut butter in fun holiday shapes like eggs, hearts, and Christmas Trees. So, when I saw someone boasting that they made homemade Reese's Eggs, I had to check it out myself.

This was a Pinterest find, and if you're scratching your head at the word "Pinterest", google it now! It's a very visual online pin board where people post photos of ideas, food, projects, books, games, jokes, quotes, inspirational photos, anything and everything really. The best part is when you click on the photo, it takes you to the source of the "pin"- a website where you can find the tutorial or recipe or find where to purchase the product shown in the pin. You may be surprised to learn that some of our very own recipes are floating around Pinterest! Check out our board here! 

Homemade Peanut Butter Eggs


How's that for simple?!

-4 Cups Powdered Sugar, Sifted

-1 1/2 Cups Creamy Peanut Butter
(I guess Crunchy would work just fine, too, if that's your preference.)

- 1/4 Cup Butter at Room Temperature

-3 Tablespoons Milk

- 3 Cups Chocolate Chips
(I used Milk Chocolate, but it's really up to you.)

-Vegetable Oil (Optional)

1. In a large bowl, mix together sugar, peanut butter, and butter. Add milk and mix until crumbly dough forms. At this point, I found it easier to work the dough with my hands than with a mixer.


2. Line a cookie sheet with wax paper. Form dough into egg shapes (or round, if that's your preference) and place on wax paper. Place cookie sheet in freezer and let set for at least 1 hour.


3. Melt chocolate in either the microwave or on the stove using a double boiler. If you're using the microwave to melt the chocolate, make sure you use a microwave safe bowl. I'm sure that's obvious, but sometimes it bears repeating. Heh. Also, microwave your chocolate in 30 second increments, stirring before returning the bowl to the microwave. If your chocolate is looking a little thick, add a teaspoon of vegetable oil and stir. **Heating chocolate does NOT thin it out. In fact, it thickens the chocolate more and renders is unusable.**

4. Dip peanut butter eggs into melted chocolate. I used a spoon to dip the eggs and tapped my wrist lightly with my left hand to remove any excess chocolate and give it a nice, even coating. Place dipped eggs onto wax paper and leave in the fridge for at least an hour to set.


5. Once they are all set, you can use a sharp serrated knife to trim off any excess chocolate that may have pooled around your egg.


Mmmm... look at all that peanut buttery goodness!

YUM!

I have to say these things are amazing and so, so simple to make. I didn't even have to turn on my oven! And the recipe goes very far. This made about 75 eggs and they were the same size if not larger than the actual Reese's eggs. This would be a great recipe to try out with kids!