This weekend is my favorite holiday!!!
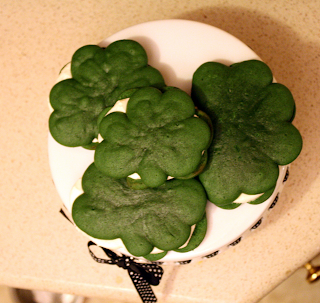
St. Patrick's Day, of course!! With names like Sullivan and O'Connor, I'm sure that's not much of a surprise though! So in celebration (and in preparation of the drunken munchies later) I've prepared Green Velvet Whoopie Pies!! These are one of my favorite desserts- is it a cookie? Is it a cake? C'mon, even the name is fun! And it's so hard to find a good one! You know the saying- if you want something done right, you've got to do it yourself. So I grabbed my green food coloring and this recipe from Annie's Eats and I was on my way!
If you notice, I tripled Annie's recipe! My reasoning was that the shamrocks would need to be larger than the hearts to get the effect and also I just wanted more to go around. I ended up with 20 shamrock sandwiches in total (and one little half circle that I just piped some icing on so I could have a taste! It was goooooood.)
Green Velvet Whoopie Pies
- 6 Cups All Purpose Flour
- 6 Tablespoons Cocoa Powder
- 1 1/2 Teaspoons Baking Powder
- 3/4 Teaspoon Salt
- 1 1/2 Cups Unsalted Butter, Room Temperature (3 Sticks)
- 3 Cups Light Brown Sugar, Packed
- 3 Large Eggs at Room Temperature
- 3 Teaspoons Vanilla Extract
- 1 1/2 Cups Buttermilk at Room Temperature
- 1/2- 1 Oz. of Green Food Coloring (McCormick)
1. Using a pencil, lightly trace your design onto parchment paper and line cookie sheets. Make sure the traced side is face down, nobody wants any lead in their whoopie pies! Also, when choosing a design to trace, make sure the design is smaller than you want the actually whoopie pie to be as the batter spreads when baked.
2. In a large mixing bowl, whisk together flour, cocoa powder, baking powder, and salt. In the bowl of your stand mixer, cream together butter and brown sugar on medium speed for about 3 minutes or until light and fluffy.
3. Switch mixer to lower speed and beat in eggs one at a time until incorporated. Beat in vanilla extract. Keeping mixer on low speed, beat in 1/3 of the flour mixture. Add in half the buttermilk and another 1/3 of the dry ingredients. Add in the rest of the buttermilk followed by the remainder of the dry ingredients.*
*For this step, it's important to do it kind of quickly. You don't want to overmix your batter so once each part is incorporated (but not before!), immediately add the next. You can stop the mixer to scrape the sides, though.*
Blend in food coloring- I used a little more than 1/2 oz. of green to achieve the color I wanted.
4. Fill a pastry bag with batter. You can either use a round tip or simply snip the end of the decorating bag. I just snipped the tip because I'm laaaaaaazy. Pipe batter along design outline and fill in the middle. It doesn't have to be perfect, it settles nicely. And besides, whoopie pies aren't really supposed to look perfect!
5. Bake on center rack about 7-9 minutes, rotating if necessary. 8 minutes was the magic number for my oven! Let cool on cookie sheet about 10 minutes before transferring to cooling rack. Use a cookie spatula to remove cookies from parchment paper. Repeat with any remaining batter.
Now since these are technically red velvet, Annie paired her cookies with a cream cheese filling, but I say nay. I loooooooove the classic whoopie pie filling so I opted to use my own recipe for the filling.
Vanilla Cream Filling
- 1/2 Cup Vegetable Shortening
- 1/2 Cup Unsalted Butter at Room Temperature (1 Stick)
- 2 Cups Powdered Sugar, sifted
- 3 Teaspoons Pure Vanilla Extract
- 3/4 Cup Light Corn Syrup
1. Cream shortening and butter together at medium speed. With mixer at lowest speed, gradually add powdered sugar until incorporated, scraping down sides when necessary. Increase speed to high and beat for about 4 minutes or until light and fluffy.
2. Decrease speed and beat in vanilla extract. Keeping mixer on low, slowly drizzle in corny syrup. Continue to beat for about 1- 2 minutes until filling has reached desired consistency.
From here you can either prepare a piping with a round tip and pipe the filling onto the cookies or you can spoon a tablespoon of filling onto each cookie. I started out by piping, but quickly switched to using a tablespoon. It really makes no difference since you're going to be squishing the filling between two cookies anyway.
Oh hello there, lover!
I can't even tell you how good that cream is!
Thanks everyone for checking out the blog! Have a happy and safe St. Patrick's Day! Don't do anything I wouldn't do! ;o)


No comments:
Post a Comment