Tuesday, January 31, 2012

Love is in the Air!

We've got some exciting news to share with you! How Sweet It Is will be participating in a Valentine's Day themed flea market in Greenpoint, Brookyln on Saturday, February 11th, 2012!

Aside from our table of delectable desserts, the flea market will feature food, live entertainment, and a great selection of gifts for your Valentine.

So please come on by and check out our table!


Monday, January 30, 2012

Words with Cookies!

Ever since getting my iPhone last year, I've been obsessed with it. I'm embarassed to say it has basically become and extension of my arm. But there's just always so much to do! Like Words with Friends for instance! I have always been a fan of word games, so it's pretty fun to have one in your pocket at any given moment.

And my friends are no different... especially my good friend, Matt. The only difference is Matt consistently beats me in Words with Friends. I wish I was joking- I only won ONCE!

Anyway, this past Christmas, Matt proposed to his girlfriend and my good friend, Teri. This past weekend was their engagement party and I knew right away what I wanted to do for them. I wanted to make cookies that were actually Words with Friends "tiles" so I could spell out a special message to the bride and groom to be!

For Christmas, I had gotten a box of 101 cookie cutters. So I've been dying to whip them out and bake up some fun shapes. Funny enough, out of 101 cookie cutters, there was not a single square or rectangle in sight. I wound up using the Haunted House cutter and just cut the "roof" off. It worked out pretty well, though it did leave me with rectangular tiles instead of square. C'est la vie!


Rolled Sugar Cookies


- 1 1/2 cups butter, softened

- 2 cups white sugar

- 4 eggs

- 1 teaspoon vanilla extract

- 5 cups all-purpose flour

- 2 teaspoons baking powder

- 1 teaspoon salt (I use salted butter and omit this part.)

1. Cream together your butter and sugar in a large bowl.


2. Beat in eggs and vanilla. Add flour, baking powder, and salt and beat on low speed until dough forms. Cover and chill dough for at least 2 hours, preferably overnight.*


Yeah, I taped it shut since my cling wrap wasn't being very clingy. And what??

*I only chilled my dough for 2 hours. It wasn't the easiest to work with. I had to use a lot of flour on my rolling surface and on my rolling pin to make it work. If it was chilled over night though, it would be much easier to work with.

3. Pre-heat oven to 300 degrees F. Generously dust rolling surface and rolling pin with flour and roll out chilled cookie dough to about 1/4" to 1/2" thickness. Cut out dough with any cookie cutter and place on ungreased cookie sheet about an inch apart.

This makes for a soft and thick sugar cookie.

4. Bake 6-8 minutes or until edges are golden. Remove from cookie sheet and cool on racks.


These stackable cooling racks are clutch in my tiny kitchen!

I actually had a bit of dough leftover after I made the necessary tiles (plus a few extra in case I messed one up!) so I decided to make some heart cookies, too.

Since Valentine's Day is coming up, of course!

From here, I whipped up some royal icing for the tops of the cookies. (Please see our Giraffe Cake post for the recipe for royal icing!) I made one batch and split it. I dyed about 3/4 of it yellow for the tiles themselves. I used Wilton's food coloring gel in "Orange" and "Sunshine Yellow" to get the proper color. I used about 3 parts of the yellow to one part of the orange. It was the perfect shade! I then dyed the leftover royal icing black and piped the letters onto the cookies.

Unfortunately, I didn't have a big enough tray to display these cookies, but I have to say, they looked pretty darn cute on my kitchen counter!


Friday, January 20, 2012

Baking With Kids

My mom is the reason that I've gotten into baking. She never ceases to astound and inspire me, especially in the kitchen! I only hope that one day I can have that effect on my own little ones. But, I'm not a mom... yet! But that doesn't mean I don't have a few special little munchkins in my life. So, I'd like to introduce you to my little helper, Hailey!


This is quite possibly one of the coolest kids I've ever had the fortune of hanging out with. And let me tell you, she knows her baking. So much so that I pretty much read out the ingredients, hung back, and let her do her thing!

Since I had a little partner to bake with, I wanted to do something fun and really different but still simple. After searching the web, I decided to try a new spin on cupcakes- baking them in ice cream cones!

We kept the flavors simple- yellow cake and vanilla buttercream frosting. For the cake, I used a recipe from http://allrecipes.com/ as it was very simple and had RAVE reviews. And I can see why, it's a really moist, delicious yellow cake!

Simple White Cake


- 1 cup sugar
- 1/2 cup butter (1 stick)
- 2 eggs
- 2 teaspoons vanilla extract
- 1 1/2 half cups all-purpose flour
- 1 3/4 teaspoon baking powder
- 1/2 cup milk


1. Pre-heat oven to 350 degrees F. Line cupcake tins with ice cream cones and set aside. I used muffin tins since it spaced them out a little more.


2. In a medium bowl, cream together sugar and butter. Beat in the eggs one at a time, then add vanilla. Combine flour and baking powder and add to creamed mixture and mix until incorporated. Stir in milk until batter is smooth.

She was SO good with measuring.

3. Pour or spoon batter into cones. I found using an ice cream scooper was the easiest and neatest way to do this.


4. Bake 20- 25 minutes. Cupcakes are done when a toothpick inserted comes out clean. Let cool before frosting.


Et voila!

From here, we made our tried and true favorite- Wilton's buttercream recipe. You can find the recipe here in our football cake post. It only takes a minute or two to whip up and it is delectable. Again, I made Hailey do most of the work.


And boy did she hate sifting! LOL!


But she was cool with it, as long as she got to lick the paddle.

From here, I piped the buttercream frosting onto our cupcakes cones using a Wilton 2D tip. This is usually my go-to tip for frosting cupcakes. It always comes out looking fancy and leaves room for imperfections.


After eating one (okay, two), I realized we forgot to add sprinkles! Whoops!


Thanks again for stopping by!


Tuesday, January 17, 2012

S'Mores Cupcakes

This blog post all started with a Christmas gift from, you guessed it! My momma. I have been dying to try this recipe out, but I've been lacking the tool that makes it fun.

 A kitchen torch!!

So much fun for such a tiny, dangerous little object! My husband was a little afraid of me when I was using it.


Heh heh heh.

Other than this and creme brulee, I have no idea what you would need a kitchen torch for. But for $10, it's worth the thrill of toasting your homemade marshmallow frosting that tops that delectable chocolate cupcake you just whipped up.

This recipe is from Martha Stewart's website, although this isn't an original recipe of hers. I'm not going to lie, I was intimidated a little bit by this recipe, especially the marshmallow frosting, but I threw up my arms and figured "Why the heck not?!" I am SO glad I did.

Chocolate Graham Cracker Cupcakes


I know, it's a lot of ingredients. I promise it's easy though!

- 2 1/4 cups plus 2 tablespoons sugar
-1 3/4 cups all-purpose flour
-3/4 cup plus 1 tablespoon cocoa powder (NOT Dutch-processed)
-1 1/2 teaspoons baking powder
-1 1/2 teaspoons baking soda
-1 teaspoon salt
-2 large eggs
-1 cup whole milk
-1/2 cup vegetable oil
-2 teaspoons pure vanilla extract
-1 cup boiling water
-1 1/2 cups graham cracker crumbs
-1/3 cup unsalted butter, melted
-9 ounces semi-sweet chocolate morsels (3/4 of the bag)

1. Pre-heat oven to 350 degrees. Line 2 cupcake tins with liners and set aside.

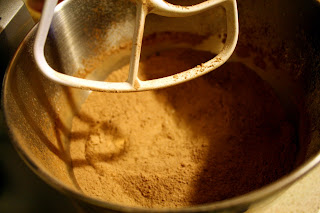
2. Sift 2 cups plus 2 tablespoons sugar (you should still have 1/4 cup of sugar leftover, set aside), flour, cocoa powder, baking powder, baking soda, and salt together in a large bowl. Mix until all ingredients are incorporated.


3. In a separate bowl, mix together eggs, milk, oil, and vanilla. Add flour to mixture and beat on medium speed for 30 seconds. Scrape sides of the bowl and continue beating on medium for an additional 2 minutes. Add boiling water and stir to combine.* Set cake batter aside.

*Before I added the boiling water, my cake batter looked pretty good. It definitely looked like batter and I was so hesitant to add this water. I thought it would be a disgusting, liquid mess. I was wrong! I'm glad I listened to Martha! ;o)

4. Place graham cracker crumbs, 1/4 cup sugar, and melted butter in a large bowl. Stir to combine.


5. Place 1 tablespoon of graham cracker mixture into the bottom of the liners. Using your fingers (or the bottom of a glass, like Martha suggests), gently pack crumbs into liner. You should have some graham cracker mixture left over. Put this to the side to sprinkle on top of cupcake batter.


6. Place 2 teaspoons semi-sweet chocolate in each liner.


Bake until the edges of the graham crackers are a golden brown, about 6 minutes. Remove from oven and fill each liner 3/4-full with chocolate cake batter. Sprinkle leftover chocolate and graham crackers over cake batter.


7. Bake cupcakes for about 17-20 minutes or until toothpick inserted in tops of cupcakes comes out clean. Let cupcakes cool for at least 1/2 hour before topping.


Marshmallow Frosting


-8 large egg whites

-2 cups sugar

-1/2 teaspoon cream of tartar

-2 teaspoons pure vanilla extract
1. Place egg whites, sugar, and cream of tartar in a heatproof bowl (I used my stand mixer's bowl after verifying that it was indeed heatproof!). Set over a saucepan of simmering water. Whisk constantly until sugar is dissolved* and egg whites are warm to the touch, about 3 to 4 minutes.


You can see the sugar still stuck along the edges of the bowl, but this is pretty much what your mixture will look like.

*A great tip I learned to tell if the sugar is dissolved: pick up a little bit of the mixture in between your fingers and rub them together. If it still feels grainy, keep whisking it on the double boiler.*

2. Transfer bowl to electric mixer fitted with whisk attachment and beat starting on low speed. Gradually increase speed to highest until stiff, glossy peaks form, about 5-7 minutes.* Add vanilla and mix until combined.


That peak is a thing of beauty!

*This is another step I was unsure of. The way my egg white mixture looked, I never dreamed it would whip into anything that I could pipe onto a cupcake and consider tasty. Wrong again! I started on the lowest speed and increased my speed one notch just about every minute until I got to 10 right at the 6 minute mark. It was actually pretty cool to watch- I wish I had taken more photos, but I was a little nervous it wasn't going to come out right so I didn't want to walk away!*

From here, I piped the frosting onto the cupcakes with Wilton's 2D tip. This icing piped onto this cupcake SO beautifully. It is somehow very firm when you pipe it, yet incredibly soft when you bite into it. It astounds me!

And now the scary part! The torching! Since I was on my own for this project, I couldn't take photos of the actual torching. BOO! But I assure you it was fun and easy. This icing was MADE to be toasted! lol! So without further ado, I present you, S'Mores Cupcakes!


I could not get over how much these actually tasted like a s'more! Especially the marshmallow frosting considering there was not a SINGLE marshmallow in the whole thing! Bananas!


Thanks for checking us out everyone!

Christmas with How Sweet It Is

As you all know, the holidays are the perfect excuse to go crazy with delectable desserts. New Year's Day and a clean slate are right around the corner so might as well live it up on Christmas!!


This year, my mom and I decided to make a dessert table for everyone. We decided not to stick to a color scheme, but to have a Gingerbread House with an explosion of colorful candies be our centerpiece. In other desserts we used a lot of red and green... it is Christmas after all!

Now since Christmas was sooooo busy, I didn't really get to photograph the step by step process for you so this blog post is pretty much a bunch of pretty pictures. Let's be real, you probably skip over half of my ramblings anyway! =)

Enjoy!!


Our dessert table!

(Chocolate Buttercream Cupcakes, Rice Pudding with Fresh Strawberries, Christmas Tree Brownies, Christmas Cake, Gingerbread House, Christmas Themed Chocolate Covered Oreos, Royal Icing decorated Sugar Cookies, Oatmeal Raisin Cookies, Petit Fours, and Mini Cheesecakes including Classic, Chocolate, and Red Velvet. PHEW!)


Our Gingerbred House. <3


Oatmeal Raisin Cookies.


Our Christmas Cake!


Royal Icing Decorated Sugar Cookies


Christmas Tree Shaped Brownies


Christmas Themed Chocolate Covered Oreos


Chocolate Buttercream Cupcakes


Assorted Mini Cheesecakes
(Including Classic, Chocolate, and Red Velvet)


Rice Pudding Shots


Hope you all had a very Merry Christmas!!!